To do that, you will need to download a zip file that includes everything that Facebook has stored about you and your profile. The good news is that this is something really simple and straightforward to do, and it is available for all users! You can check out how to recover the deleted Facebook files down below!
Recover deleted Facebook files
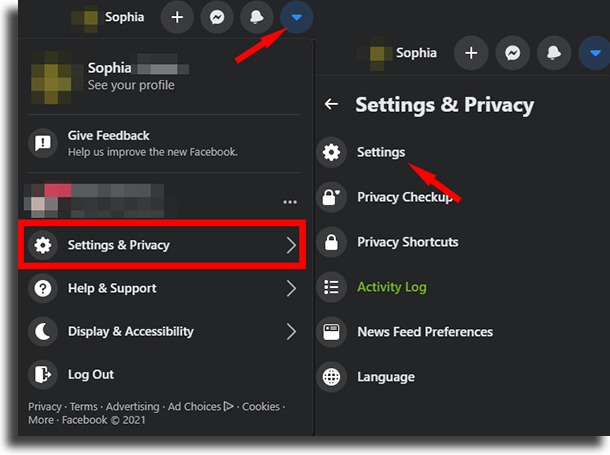
Before we go any further, it is worth saying that, while this is a good way to get your deleted files back, unfortunately, the older messages that you have deleted throughout the years are hard to be recovered. Even so, it is worth a shot to try out this method to see if you can’t get what you want back. The steps are really simple and quick, so there’s no reason why you shouldn’t try it out. This can also be a good way to simply get a backup of all your files and data, should you want to delete them from the platform, for instance. First of all, open up Facebook and log into your account. To follow these steps, it is required to do it in one of the best web browsers around, such as Google Chrome, Firefox, and many others. You can’t do it on the mobile app! With that done, you’ll see an arrow on the right side of the screen. Click on it and then select the “Settings and Privacy” option afterward, and finally click on “Settings”, as shown in the image below.
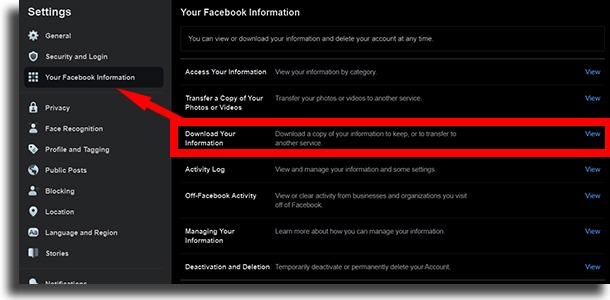
You will be taken to the page where you can change the general settings of your Facebook profile. Click the “Your Facebook Information” option to go forward with the steps to recover your deleted Facebook files. On the next screen, you will see a screen where you can find the “Download your information” option. Click on it and you will be taken to the next screen for this!.
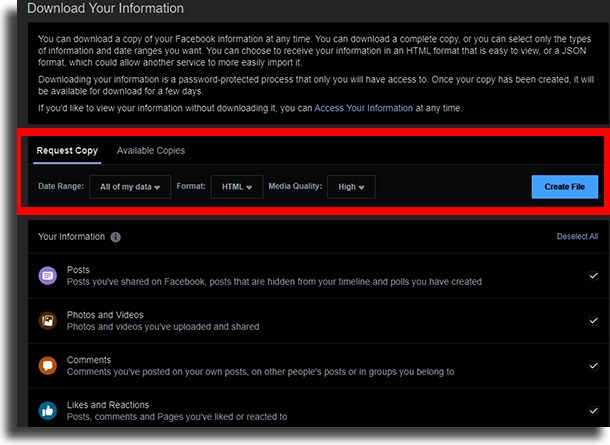
Now, you can select exactly what kind of information on your account you want to download. You can also select what’s the time interval that you want to download if you don’t want to create a file with literally everything in it. You can also select the format in which the file will be created between HTML and JSON, so that Facebook can better compress the images and the information. We recommend you choose HTML, since it is easier to use. All of these settings will be found in the horizontal menu:
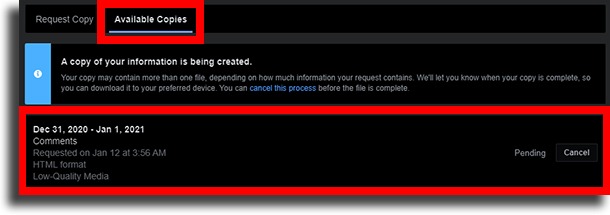
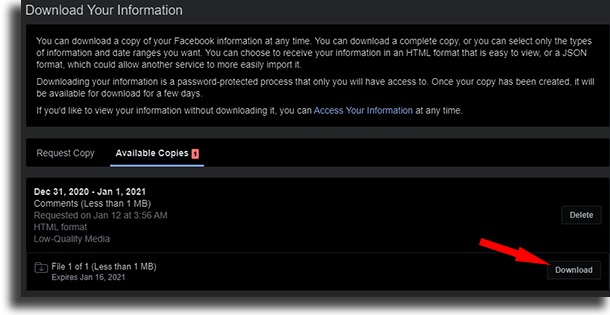
After doing all of that and choosing exactly what you want to save to this file, as well as the file format, all you’ll need to do is to select the “Create File” option. After that, you will be notified when the file is ready for download. When it is, you can find it on the “Available Copies” option. Initially, the file will be marked as Pending until the process is finished by Facebook. The time needed will depend upon what you chose to include in this file.
Don’t worry, you simply need to wait now for Facebook to finish it all up. You can close this tap and when everything is done you will be notified. Other than that, you will also receive an email letting you know that the file was requested, as well as when it is ready to download. After getting the notification, go to the same page and click the Download button to download it to your PC. However, for your own safety, you need to confirm your password when you click the Download button.
The file with the deleted Facebook files will be available in this page for you to recover them whenever you want. It expires a few days after it is created, but you just need to this again to get them back! After you extract the compacted file using software such as WinRar and WinZip, you will see several folders with all your info split up and organized. If you’ve chosen HTML, you can even open each history individually! It’s recommended to be careful as to where you’ll store this file, since it will contain some personal data you might not want others to see.
Did you manage to get your files back?
Let us know in the comments if we helped you out when you needed to recover deleted Facebook files, and don’t forget to also check out our guide on how to learn if you’ve been blocked on Facebook Messenger and learn what to do if you think you might have a dead iPhone!
